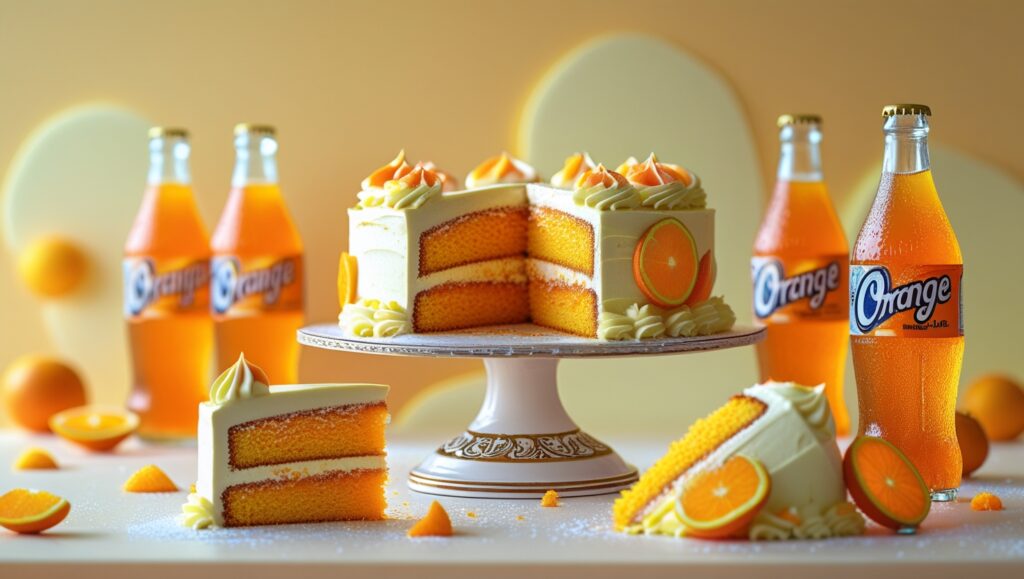
Orange You Glad You Found This Recipe? The Ultimate Orange Creamsicle Cake (with a Secret Ingredient!)
Get ready to dive headfirst into a citrusy, creamy dream! Today, we’re not just baking a cake; we’re crafting an experience. We’re talking about an Orange Creamsicle Cake With Orange Soda so moist, so bursting with flavor, and so utterly delightful, it will transport you straight back to those carefree summer days of chasing the ice cream truck. And the secret ingredient? Well, you’ll just have to keep reading to find out!
This isn’t your grandma’s plain old orange cake. We’re taking things up a notch by infusing every layer with the bright, zesty goodness of fresh oranges and a surprising twist – the bubbly magic of orange soda! Yes, you heard that right. This ingredient isn’t just for sipping; it’s the key to an incredibly tender crumb and an extra layer of citrusy sweetness that will make your taste buds sing.
Whether you’re a seasoned baker or just starting your culinary journey, this recipe is designed to be fun, easy to follow, and guaranteed to impress. We’ll break down each step with clear instructions and, to make things even easier (and way more visually appealing!), we’ll show you exactly what each stage should look like with helpful images.
So, buckle up, preheat those ovens, and let’s get ready to create the most irresistible Orange Creamsicle Cake you’ve ever tasted!
Why This Orange Creamsicle Cake is a Must-Bake:
Before we dive into the delicious details, let’s talk about why this particular Orange Creamsicle Cake deserves a spot on your baking to-do list:
- Intense Orange Flavor: We’re not skimping on the orange! Fresh zest, juice, and that secret ingredient (hint: it’s fizzy!) work together to create a vibrant and authentic citrus taste.
- Incredibly Moist Texture: Say goodbye to dry, crumbly cakes! The addition of orange soda and other carefully balanced ingredients ensures a tender and melt-in-your-mouth texture that will have everyone coming back for seconds.
- Nostalgic Creamsicle Vibe: The combination of bright orange and creamy vanilla frosting perfectly captures the iconic flavor of the beloved Creamsicle treat. It’s a taste of childhood in every bite.
- Surprisingly Easy to Make: Despite its impressive flavor and texture, this cake is beginner-friendly. We’ll guide you through each step with clear instructions and visual aids.
- Perfect for Any Occasion: Whether it’s a birthday celebration, a summer barbecue, or just a craving for something sweet and uplifting, this Orange Creamsicle Cake is always a crowd-pleaser.
Let’s Gather Our Ingredients:
Before we start baking, let’s make sure we have all the necessary ingredients on hand. This will make the process smooth and enjoyable.
For the Orange Creamsicle Cake With Orange Soda:
- All-Purpose Flour: 3 cups (360 grams) – The foundation of our cake, providing structure.
- Granulated Sugar: 2 cups (400 grams) – Adds sweetness and helps with browning.
- Baking Powder: 3 teaspoons – Our leavening agent, ensuring a light and fluffy cake.
- Baking Soda: 1 teaspoon – Another leavening agent that reacts with the acidity of the orange juice and buttermilk (or our substitution).
- Salt: 1 teaspoon – Enhances the other flavors in the cake.
- Unsalted Butter: 1 cup (2 sticks or 227 grams), softened – Adds richness and moisture.
- Vegetable Oil: ½ cup (120 ml) – Contributes to the cake’s moistness.
- Large Eggs: 4 – Bind the ingredients together and provide structure.
- Orange Zest: 2 tablespoons (from about 2-3 large oranges) – Packs a punch of fresh orange flavor.
- Fresh Orange Juice: ¾ cup (180 ml) – Adds moisture and vibrant citrus notes.
- Buttermilk: 1 cup (240 ml) – Contributes to the cake’s tenderness and tanginess. (See our easy substitution below!)
- Orange Soda: ½ cup (120 ml) – Our secret ingredient for extra moisture and orange flavor!
- Vanilla Extract: 1 teaspoon – Enhances the overall flavor profile.
Easy Buttermilk Substitution:
If you don’t have buttermilk on hand, don’t worry! You can easily make your own:
- Combine 1 cup of milk (dairy or non-dairy) with 1 tablespoon of lemon juice or white vinegar.
- Stir and let it sit at room temperature for 5-10 minutes until it slightly thickens and curdles. This is your homemade buttermilk!
For the Creamy Vanilla Frosting:
- Unsalted Butter: 1 cup (2 sticks or 227 grams), softened – The base of our creamy frosting.
- Powdered Sugar: 4-5 cups (480-600 grams), sifted – Adds sweetness and structure to the frosting. Start with 4 cups and add more as needed to reach your desired consistency.
- Heavy Cream or Milk: 3-4 tablespoons – Adds moisture and helps create a smooth and spreadable frosting.
- Vanilla Extract: 1 teaspoon – Enhances the vanilla flavor.
- Orange Zest: 1 teaspoon (optional, for a hint of orange in the frosting) – Adds another layer of citrus.
Equipment You’ll Need:
- Two 9-inch round cake pans
- Mixing bowls (large and medium)
- Electric mixer (handheld or stand mixer)
- Whisk
- Rubber spatula
- Measuring cups and spoons
- Fine-mesh sieve (for sifting powdered sugar)
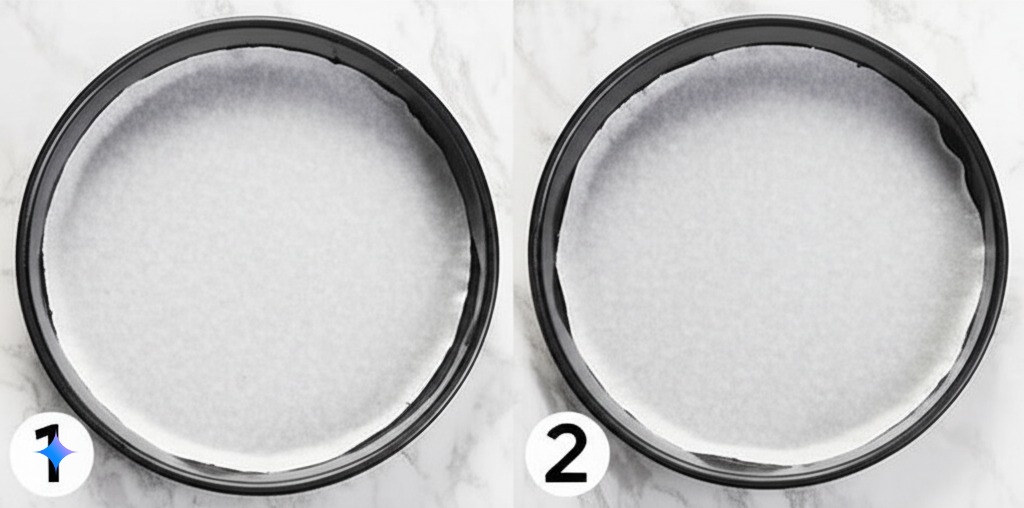
- Parchment paper rounds (optional, but recommended for easy cake removal)
- Cooling rack
- Offset spatula or knife for frosting
Step-by-Step: Baking Your Orange Creamsicle Cake With Orange Soda
Alright, let’s get down to the fun part – baking! Follow these simple steps, and you’ll be enjoying a slice of citrusy heaven in no time.
Step 1: Preheat Your Oven and Prepare Your Pans
Preheat your oven to 350°F (175°C). Grease and flour your two 9-inch round cake pans. For extra insurance against sticking, you can also line the bottoms of the pans with parchment paper rounds.
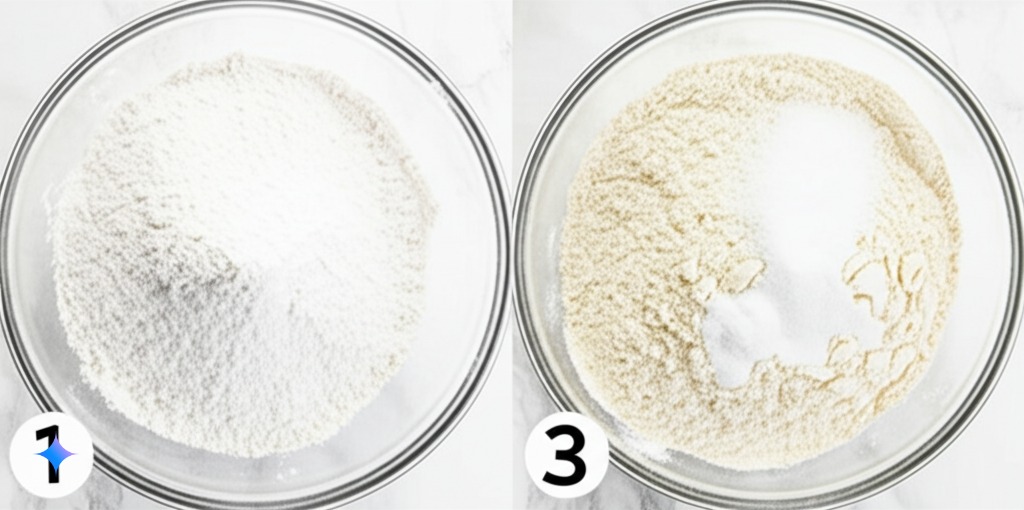
Step 2: Whisk Together the Dry Ingredients
In a large mixing bowl, whisk together the all-purpose flour, granulated sugar, baking powder, baking soda, and salt. Make sure everything is well combined. This helps to distribute the leavening agents evenly throughout the batter.
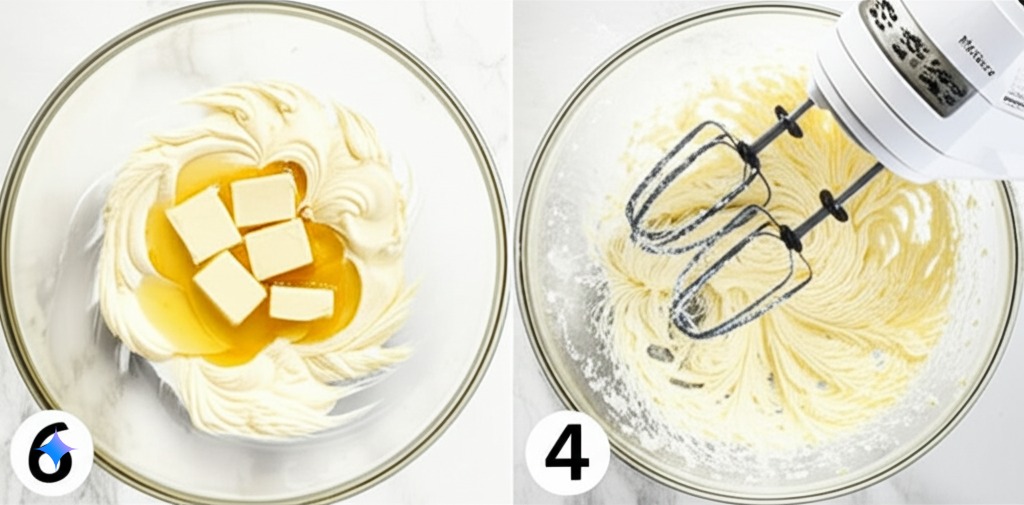
Step 3: Cream Together the Wet Ingredients (Part 1)
In a separate large mixing bowl (or the bowl of your stand mixer), cream together the softened unsalted butter and vegetable oil until light and fluffy. This usually takes about 2-3 minutes with an electric mixer.
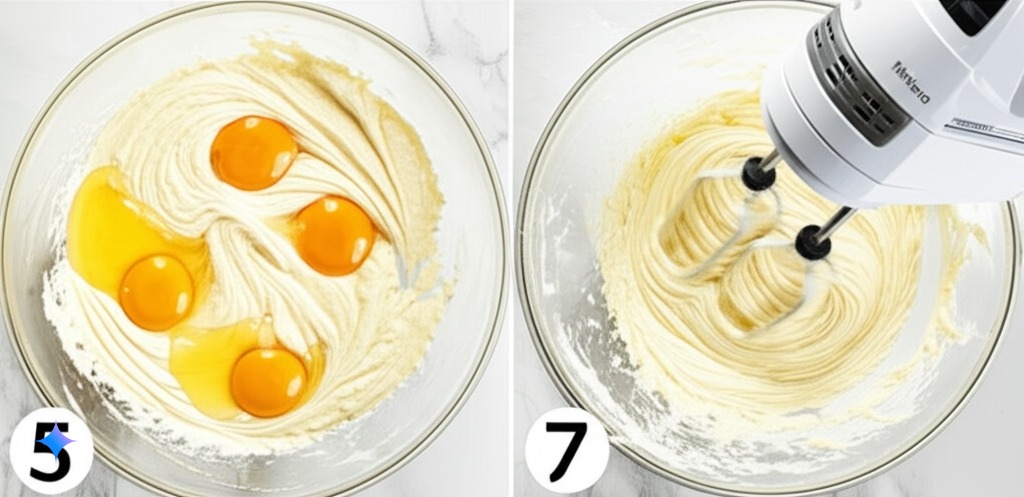
Step 4: Beat in the Eggs
Beat in the eggs one at a time, making sure each egg is fully incorporated before adding the next. Scrape down the sides of the bowl as needed to ensure everything is evenly mixed.
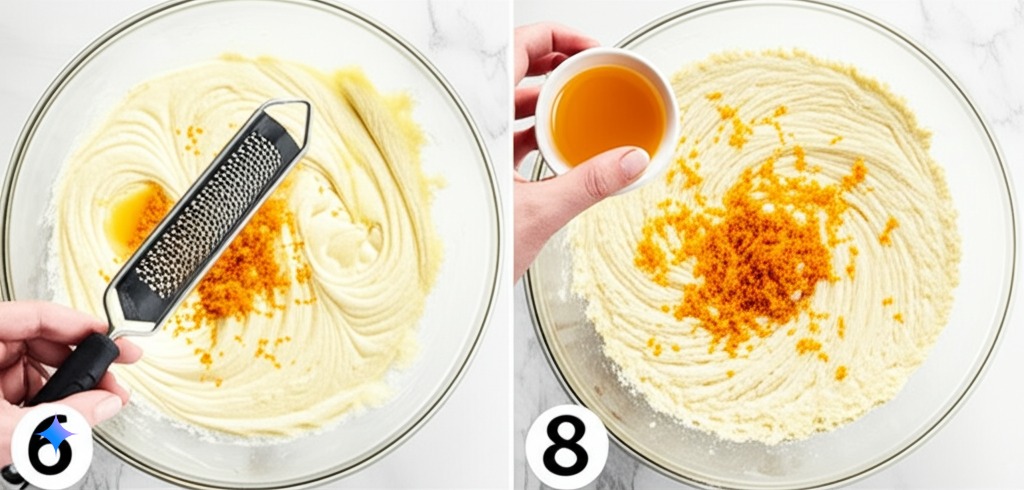
Step 5: Add the Orange Zest and Vanilla Extract
Stir in the fresh orange zest and vanilla extract. The aroma will already start to fill your kitchen with a delightful citrusy scent!
Step 6: Alternate Adding Dry and Wet Ingredients
Gradually add the dry ingredients to the wet ingredients in three additions, alternating with the fresh orange juice and buttermilk (or your substitution) in two additions. Begin and end with the dry ingredients. Mix on low speed until just combined. Be careful not to overmix, as this can lead to a tough cake.
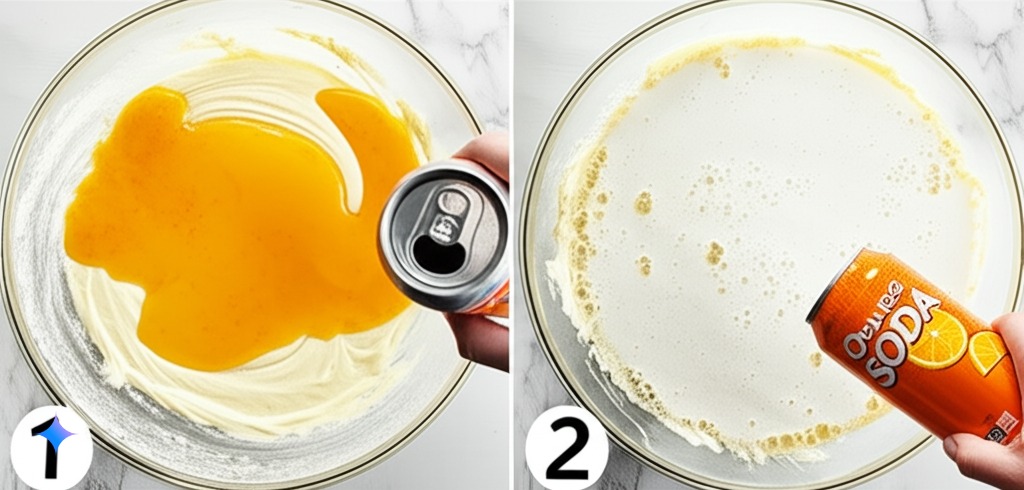
Step 7: Stir in the Secret Ingredient – Orange Soda!
Now for our star player! Gently stir in the orange soda until just combined. You might notice a slight fizzing action – that’s perfectly normal and helps create that wonderful texture.
Step 8: Divide the Batter and Bake
Pour the cake batter evenly into your prepared cake pans. Bake for 30-35 minutes, or until a wooden skewer inserted into the center comes out clean. The tops of the cakes should be lightly golden.

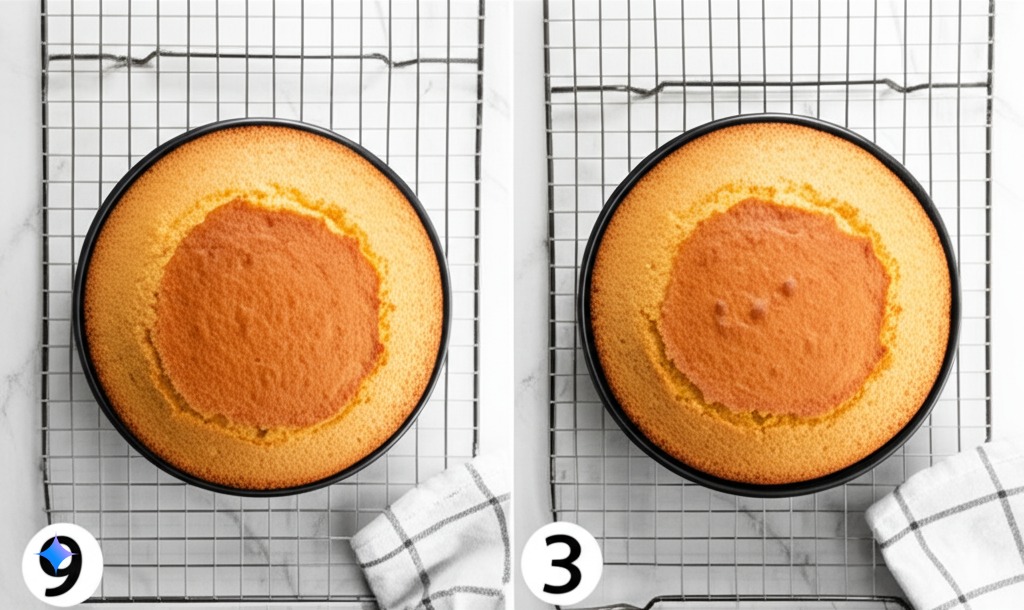
Step 9: Cool the Cakes
Once baked, remove the cakes from the oven and let them cool in the pans for 10-15 minutes before inverting them onto a wire rack to cool completely. It’s crucial for the cakes to be completely cool before frosting, otherwise, the frosting will melt.
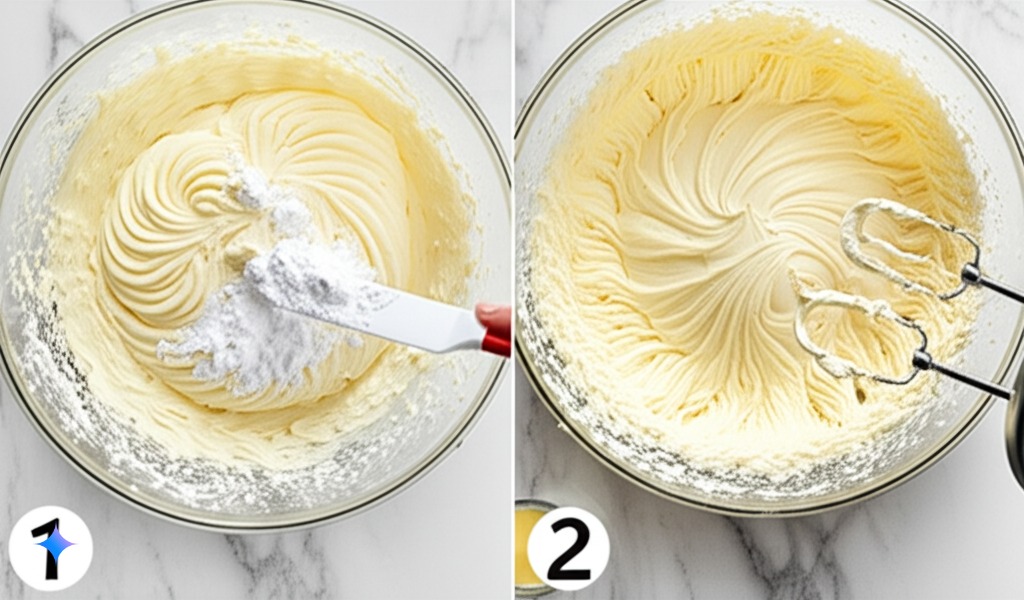
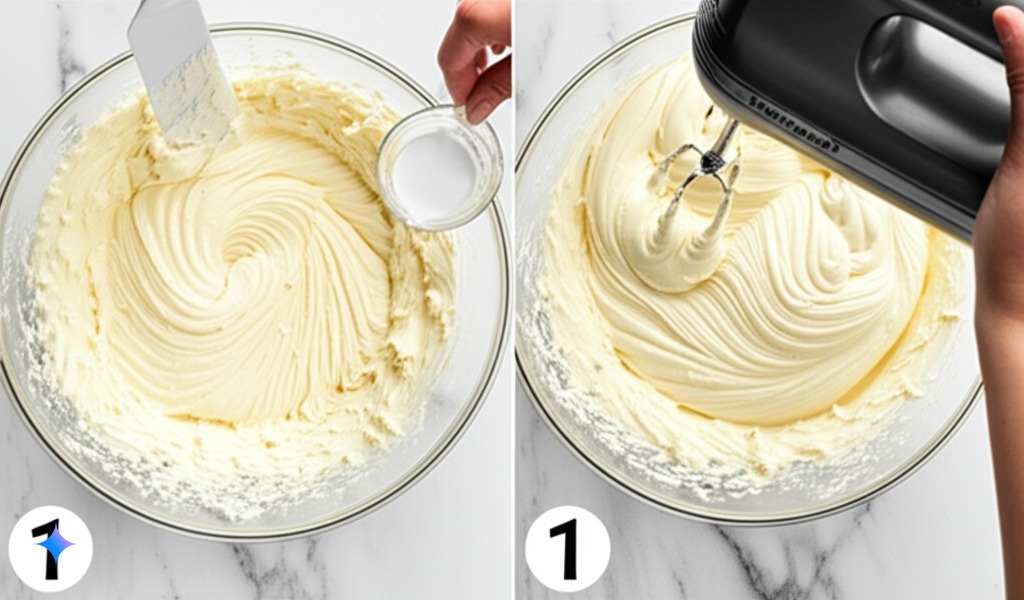
Step 10: Prepare the Creamy Vanilla Frosting
While the cakes are cooling, let’s make the frosting. In a large mixing bowl (or the bowl of your stand mixer), beat the softened unsalted butter until light and creamy. Gradually add the sifted powdered sugar, one cup at a time, beating well after each addition.
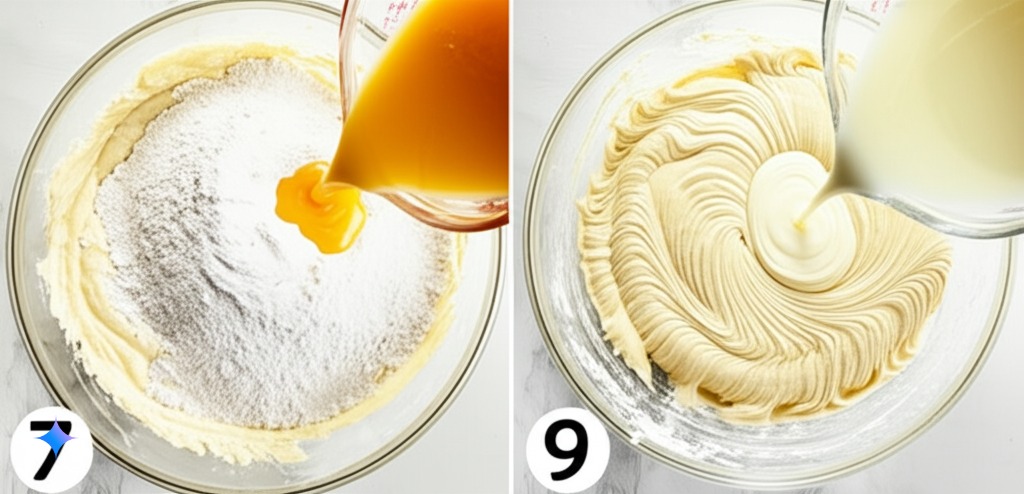
Step 11: Add Liquid and Flavorings to the Frosting
Stir in the heavy cream or milk, vanilla extract, and optional orange zest. Beat on medium-high speed until the frosting is light, fluffy, and the desired consistency is reached. If the frosting is too thick, add a little more liquid, one teaspoon at a time. If it’s too thin, add a bit more sifted powdered sugar.
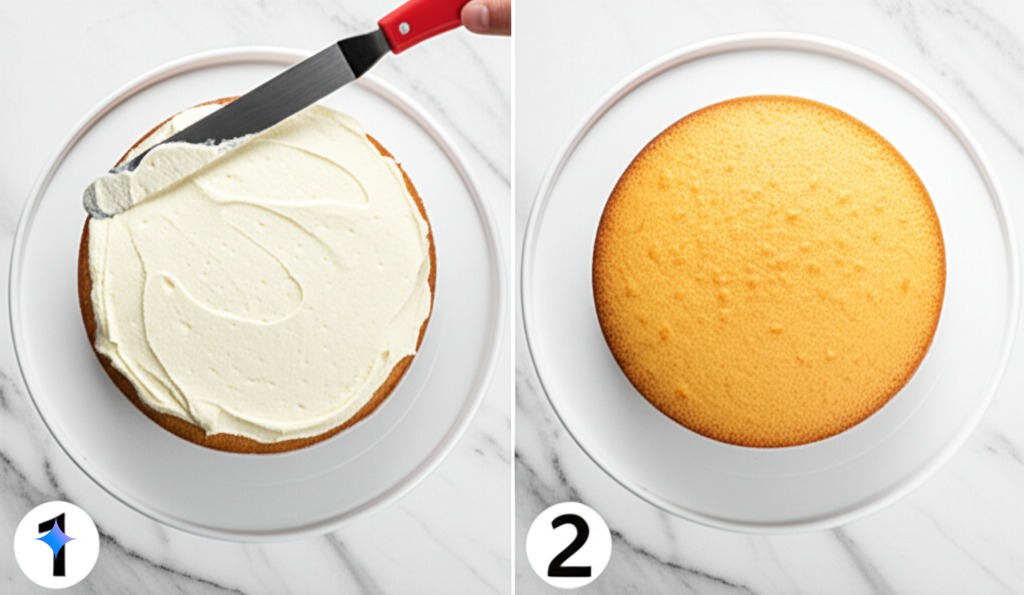
Step 12: Frost and Decorate Your Masterpiece!
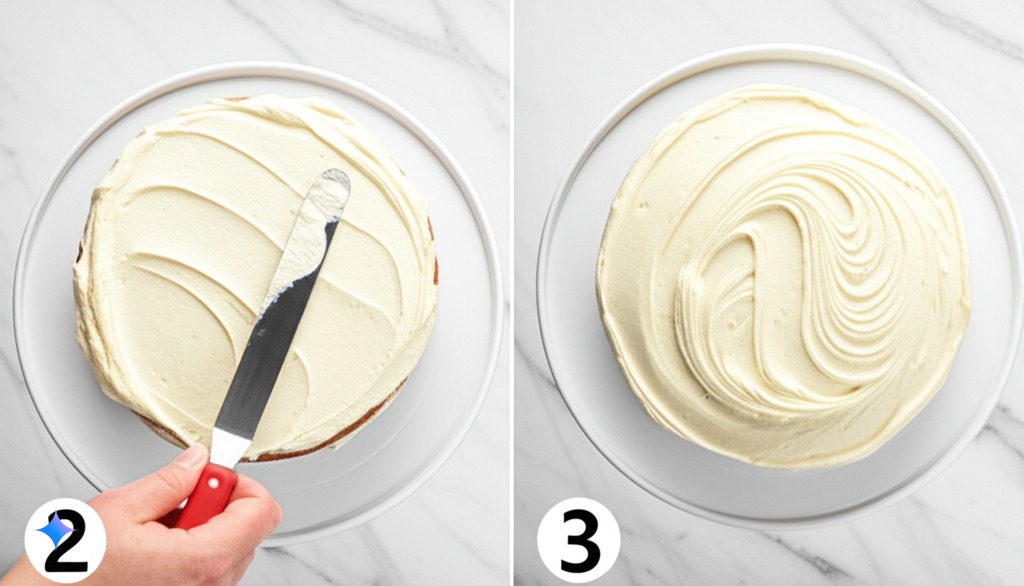
Once the cakes are completely cool, place one cake layer on a serving plate or cake stand. Spread a generous layer of the vanilla frosting evenly over the top. Carefully place the second cake layer on top.
Frost the top and sides of the cake with the remaining vanilla frosting. You can create swirls, smooth it out, or get creative with your frosting techniques!
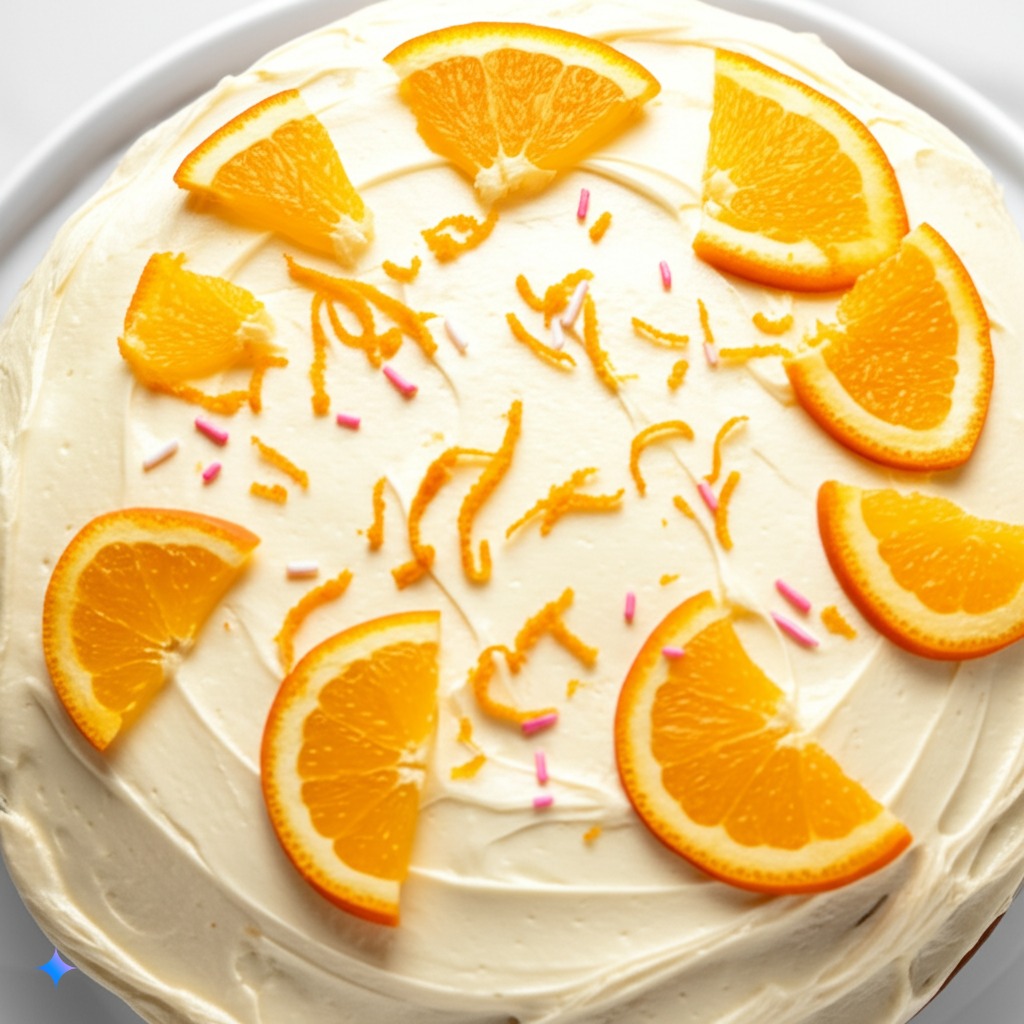
Optional Decorations:
- Orange Slices: Arrange thin slices of fresh orange on top of the cake for a beautiful and fragrant garnish.
- Orange Zest: Sprinkle extra orange zest over the frosting for a pop of color and flavor.
- Creamsicle Swirl: Melt a small amount of white chocolate and mix in a few drops of orange food coloring. Drizzle the melted chocolate over the frosting for a creamsicle-inspired swirl.
- Sprinkles: Orange and white sprinkles are always a fun and festive addition!
Tips for Baking the Perfect Orange Creamsicle Cake With Orange Soda:
To ensure your Orange Creamsicle Cake turns out absolutely perfect, here are a few extra tips and tricks:
- Use Room Temperature Ingredients: Make sure your butter, eggs, and buttermilk (or substitution) are at room temperature before you begin baking. This helps them emulsify properly, resulting in a smoother batter and a more tender cake.
- Don’t Overmix the Batter: Overmixing develops the gluten in the flour, which can make your cake tough. Mix the wet and dry ingredients until just combined. A few lumps are okay.
- Properly Measure Your Flour: The most accurate way to measure flour is using the “spoon and level” method. Spoon the flour lightly into your measuring cup and then level off the excess with a straight edge. Avoid scooping directly from the bag, as this can pack the flour and result in too much being used.
- Zest First, Then Juice: It’s always easier to zest your oranges before you juice them.
- Taste Your Orange Soda: While any standard orange soda will work, some are more intensely flavored than others. Taste your soda beforehand; if it has a very subtle flavor, you might consider adding a touch more orange zest to your batter.
- Check for Doneness Properly: Don’t just rely on the baking time. Insert a wooden skewer into the center of the cake. If it comes out clean with no wet batter attached, the cake is done.
- Cool Completely Before Frosting: This is a non-negotiable rule! Frosting a warm cake will cause it to melt and slide right off. Be patient and let your cakes cool completely on a wire rack.
- Chill for Easier Frosting: If you find your cake layers are a bit crumbly, you can wrap them tightly in plastic wrap and chill them in the refrigerator for about 30 minutes before frosting. This will make them firmer and easier to handle.
- Use Quality Vanilla Extract: The flavor of vanilla really shines through in the frosting, so opt for a good quality pure vanilla extract.
- Sift Your Powdered Sugar: Sifting the powdered sugar before making the frosting helps to remove any lumps and ensures a smooth and creamy consistency.
- Adjust Frosting Consistency: Don’t be afraid to adjust the amount of liquid or powdered sugar in your frosting to reach your desired consistency. Add liquids a teaspoon at a time and powdered sugar a quarter cup at a time.
- Get Creative with Layers: While this recipe is for a two-layer cake, you could also bake it in a 9×13 inch pan or make cupcakes! Adjust the baking time accordingly.
- Storage: Store leftover Orange Creamsicle Cake in an airtight container at room temperature for up to 2-3 days or in the refrigerator for up to a week. For longer storage, you can freeze individual slices wrapped tightly in plastic wrap and then placed in a freezer-safe bag or container for up to 3 months. Thaw overnight in the refrigerator before serving.
Variations and Adaptations:
Want to put your own spin on this Orange Creamsicle Cake? Here are a few ideas:
- Mini Orange Creamsicle Cupcakes: Turn this recipe into adorable cupcakes! Fill cupcake liners about two-thirds full and bake for 18-22 minutes, or until a toothpick inserted into the center comes out clean. Frost as desired.
- Orange Creamsicle Loaf Cake: Bake the batter in a greased and floured loaf pan (approximately 9×5 inches). Adjust the baking time to around 45-55 minutes, or until a skewer comes out clean. You can top it with a simple glaze made from powdered sugar and orange juice instead of the full frosting.
- Lemon Creamsicle Cake: Swap out the orange zest, juice, and soda for lemon zest, juice, and lemon-lime soda for a tangy lemon version.
- Grapefruit Creamsicle Cake: For a more sophisticated citrus flavor, try using grapefruit zest, juice, and a grapefruit-flavored sparkling water.
- Add a Filling: Before adding the top cake layer, spread a layer of orange curd or a homemade whipped cream for an extra burst of flavor and creaminess.
- Chocolate Orange Creamsicle Cake: For a delightful twist, add 1/4 cup of unsweetened cocoa powder to the dry ingredients for a hint of chocolate. You can also use a chocolate frosting or a chocolate ganache drizzle.
- Vegan Orange Creamsicle Cake: With a few substitutions, this cake can easily be made vegan. Use a plant-based butter alternative, a flax egg or other egg replacer, and a plant-based milk for the buttermilk substitution. Ensure your frosting ingredients are also vegan-friendly.
The Science Behind the Deliciousness:
Let’s take a moment to appreciate the science that makes this Orange Creamsicle Cake so special:
- Leavening Agents (Baking Powder & Baking Soda): These ingredients react with heat and moisture to produce carbon dioxide gas, which creates air bubbles in the batter, resulting in a light and fluffy cake. Baking soda also reacts with the acidity of the orange juice and buttermilk, providing an extra lift.
- Fat (Butter & Oil): Fat adds richness, moisture, and tenderness to the cake. Butter contributes flavor, while oil helps to keep the cake moist for longer.
- Sugar: Besides adding sweetness, sugar also helps with browning and contributes to the cake’s texture by inhibiting gluten development.
- Eggs: Eggs provide structure, bind the ingredients together, and add richness and moisture.
- Orange Zest & Juice: These provide the primary orange flavor. The zest contains the concentrated oils of the orange peel, offering a more intense aroma and flavor than the juice alone. The juice adds moisture and a touch of acidity.
- Buttermilk: The acidity in buttermilk tenderizes the gluten in the flour, resulting in a more tender cake crumb. It also adds a subtle tanginess that complements the sweetness of the cake.
- Orange Soda: This is our secret weapon! The carbonation in the soda adds extra lift and contributes to the cake’s light and airy texture. The added sugar and orange flavor enhance the overall sweetness and citrusy notes.
- Vanilla Extract: Vanilla enhances the other flavors in the cake, creating a more well-rounded and delicious taste.
Why Fresh, High-Quality Ingredients Matter:
While this recipe is relatively simple, using fresh, high-quality ingredients can make a significant difference in the final taste and texture of your Orange Creamsicle Cake.
- Fresh Oranges: Using freshly zested and juiced oranges will provide a much brighter and more vibrant flavor than store-bought extracts or bottled juice.
- Good Quality Butter: Opt for a good quality unsalted butter, as it will have a richer flavor that will translate into your cake and frosting.
- Fresh Eggs: Fresh eggs contribute to better leavening and a more stable batter.
- Quality Vanilla: As mentioned before, a good quality vanilla extract will elevate the flavor of your frosting.
Serving Suggestions:
Your beautiful Orange Creamsicle Cake is ready to be enjoyed! Here are a few serving suggestions to make it even more delightful:
- Classic Slice: Simply cut a generous slice and savor the deliciousness on its own.
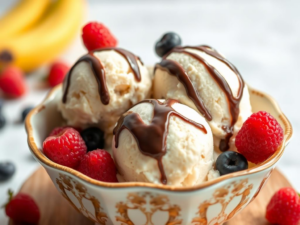
- With a Scoop of Vanilla Ice Cream: Enhance the creamsicle experience by serving each slice with a scoop of creamy vanilla ice cream.
- Alongside Fresh Berries: The bright citrus flavors of the cake pair wonderfully with the tartness of fresh berries like raspberries, blueberries, or strawberries.
- A Dollop of Whipped Cream: A light and airy dollop of freshly whipped cream is always a welcome addition.
- With a Glass of Orange Soda: For the ultimate orange indulgence, serve a slice of cake with a chilled glass of your favorite orange soda.
- As Part of a Dessert Platter: Include slices of this cake on a dessert platter with other citrus-themed treats for a vibrant and flavorful spread.
Final Thoughts: Baking Joy and Sharing Sweetness
Baking is more than just following a recipe; it’s about creating something delicious with your own hands and sharing it with the people you love. This Orange Creamsicle Cake With Orange Soda with its secret ingredient of orange soda is a perfect example of how simple ingredients can come together to create a truly memorable treat.
We hope you have enjoyed following along with this detailed recipe and that you feel inspired to bake your own Orange Creamsicle Cake With Orange Soda. The bright citrus flavors, the incredibly moist texture, and the nostalgic creamsicle vibe are sure to bring a smile to everyone’s face.
Don’t forget to share your baking adventures with us! Tag us in your photos on social media – we can’t wait to see your beautiful creations. And if you have any questions or variations you’d like to share, please leave a comment below. Happy baking, and may your days be filled with sweet moments and the delightful taste of orange creamsicle!